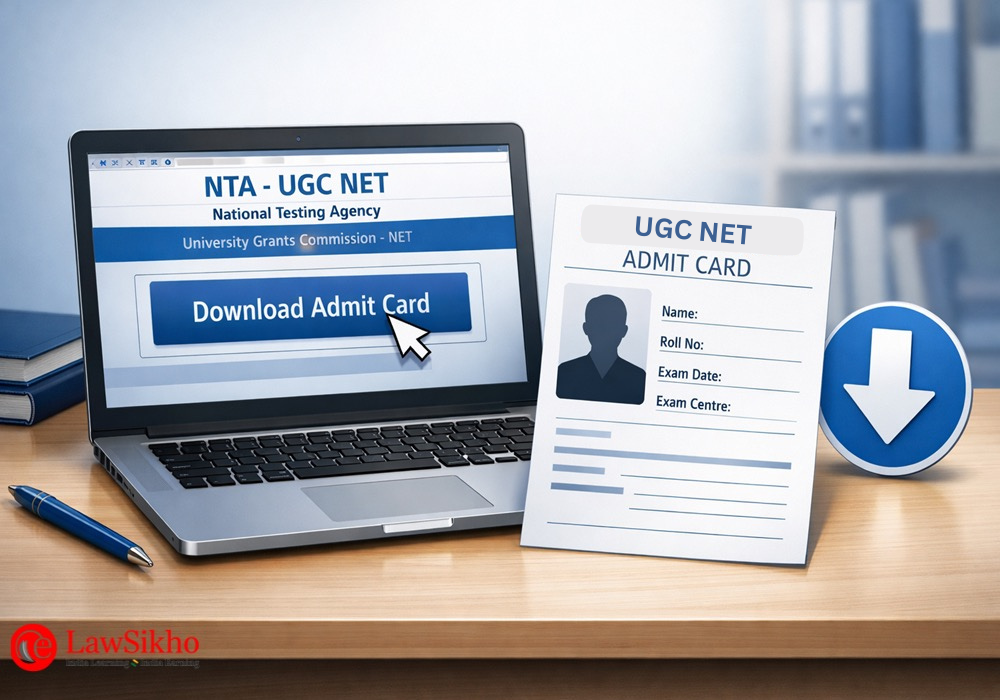
Here’s how to download the UGC NET Admit Card. Visit the UGC NET NTA website and click on…
The UGC NET admit card is released approximately 7–10 days before the examination for the respective subjects. Prior to this, the National Testing Agency (NTA) issues the City Intimation Slip to enable candidates to make necessary arrangements for appearing in the exam. This article explains the step-by-step procedure to download the UGC NET admit card and the city intimation slip.
Release date of UGC NET Admit Card
NTA follows a consistent pattern for admit card release, typically making the hall tickets available a few days before each examination date. Understanding this timeline helps you plan when to check the website and ensures you are not caught off guard by a sudden release.
Typical Release Timeline Before Exams
Based on previous exam cycles, NTA generally releases the UGC NET admit card approximately four to seven days before the scheduled examination date. For exams conducted across multiple days, the admit cards are often released in batches.

For instance, during the June session, admit cards for the 25th and 26th June exams were released on 23rd June, while admit cards for subsequent dates were made available four days before each respective exam date.
Before the admit card release, NTA first publishes the city intimation slip, this was for the June 2025 exam, which informs candidates about their allocated exam city. This city slip typically appears approximately one to two weeks before the admit card.
The city slip does not contain the exact exam center address; that information only comes with the admit card. This staggered release allows candidates to make preliminary travel arrangements based on the city allocation.
December Session Expected Dates
For the UGC NET December session, the examination is scheduled from last of December till end of January across 85 subjects. Based on NTA’s established patterns, the city intimation slip is expected to release in the second week of December , while the admit cards should become available in the third to fourth week of December.
The subject wise exam date schedule, which tells you exactly when your paper will be conducted, is typically released alongside or shortly before the admit card.
Candidates should note that these dates are tentative and subject to change based on NTA notifications. The best practice is to regularly check the official NTA UGC NET portal from early December onwards.
How to Download UGC NET Admit Card and City Intimation Slip
Downloading your admit card is a straightforward process once you know exactly where to go and what credentials to enter. NTA provides multiple download methods to ensure candidates can access their hall tickets even if they have forgotten certain login details.
Download Using Application Number and Password
This is the primary and most commonly used method to download your UGC NET admit card. You will need the application number you received during registration and the password you created at that time.
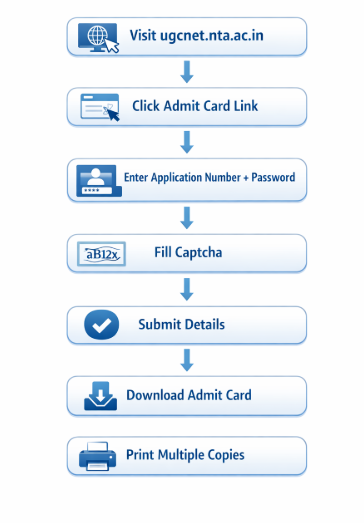
Step 1: Visiting the Official NTA Website
Open your web browser and navigate to the official UGC NET website at ugcnet.nta.ac.in. This is the only authorized source for downloading your admit card. Avoid clicking on links from third party websites or social media posts claiming to provide direct download links, as these could be phishing attempts.
Once on the homepage, you will see various announcements and links related to the current exam cycle.
Make sure you are using an updated browser like Google Chrome, Mozilla Firefox, or Microsoft Edge. Outdated browsers sometimes have compatibility issues with NTA’s portal.
If the website does not load properly, try clearing your browser cache or switching to a different browser altogether.
Step 2: Locating the Admit Card Download Link
On the NTA UGC NET homepage, look for the “Candidate Activity” section or a prominently displayed link that says “Download Admit Card for UGC NET December 2025” or similar text.
During the admit card release period, this link is usually highlighted or placed at the top of the announcements section. Click on the link to proceed to the login page.
If you cannot find the admit card link on the main page, check the “Public Notices” section on the website. Sometimes the link is embedded within a notification rather than displayed as a standalone button.
You can also try accessing the candidate login portal directly and looking for the admit card option after logging in.
Step 3: Entering Login Credentials and Security Pin
On the login page, you will see fields for your application number and password. Enter your application number exactly as it appears in your registration confirmation. This is typically a numeric code that was sent to your registered email and mobile number after successful form submission.
Enter your password in the next field; this is the password you created during the registration process. Below the credential fields, you will see a security pin or captcha that you need to enter. This captcha is a combination of letters and numbers displayed in an image format.
Type it carefully in the designated field, ensuring you distinguish between similar looking characters like zero and the letter O, or the number one and lowercase L. Once all fields are filled, click the “Sign In” or “Submit” button.
Step 4: Downloading and Saving the PDF
After successful login, your admit card will be displayed on the screen. Before downloading, take a moment to visually verify that the displayed document is indeed yours by checking your name and photograph.
Click on the “Download” button to save the admit card as a PDF file on your device. Choose a location on your computer where you can easily find the file later.
Once downloaded, open the PDF to ensure it has downloaded completely without any corruption. The file should display all pages clearly, including your personal details, exam information, and instructions.
Take at least two or three printouts on clean A4 size paper using a printer that produces clear output. Store one copy in a safe place as backup and keep another ready to carry to the exam center.
H2: How to Download the City Intimation Slip?
The city intimation slip is released before the admit card and provides preliminary information about your exam location. While it does not contain the complete exam center address, it helps you plan your logistics in advance.
Accessing the City Slip Before Admit Card Release
The city intimation slip becomes available on the NTA UGC NET portal approximately one to two weeks before the admit card release. To download it, visit the same official website and look for a link labeled “Candidate Activity”, and then click on download “Advance City Intimation” link using your application number and password, similar to the admit card download process.
Once you access the city slip, note down the city name allocated to you. This information allows you to start researching accommodation options if you need to travel, check transport connectivity to that city, and make preliminary travel bookings. The city allocation is based on your preference selections during form filling and the availability of exam centers.
Information Available in the City Intimation Slip
The city intimation slip contains your name, application number, the subject you have registered for, and the city where your exam center will be located. It also mentions your exam shift, which tells you whether you will appear in the morning session (9:00 AM to 12:00 PM) or the afternoon session (3:00 PM to 6:00 PM).
However, it does not include the exact exam center name or address.
Think of the city slip as a preliminary notification that helps you prepare logistically before the complete details arrive with the admit card. If the allocated city is different from what you expected or creates significant travel challenges, there is typically no provision for changing it at this stage unless there are exceptional circumstances that NTA considers on a case by case basis.
Information Included in the UGC NET Admit Card
Your admit card contains multiple categories of information that serve different purposes during the examination process. Understanding what each section means helps you verify your details accurately and know what to expect on exam day.
Personal Details Section
The personal details section establishes your identity and links the admit card to your registration record. Every piece of information here must match your original application form and the ID proof you carry to the exam center.
Candidate Name, Roll Number, and Application Number
Your name appears on the admit card exactly as you entered it during registration. The roll number is a unique identifier assigned by NTA specifically for this examination; it is different from your application number and is used to track your answer sheet and results.
The application number is the same one you received during registration and used to log in for downloading the admit card.
These three identifiers serve distinct purposes: your name establishes personal identity, the application number links to your registration data, and the roll number is used for exam administration and result processing.
Make sure all three are correctly printed, as discrepancies can cause problems during verification at the exam center and later during result declaration.
Photograph, Signature, and Category Information
The photograph on your admit card is the one you uploaded during the application process. It should be clearly visible and match your current appearance reasonably well. The signature image is also taken from your application form. Both these images are compared with your physical appearance and live signature at the exam center.
Your category (General, OBC-NCL, SC, ST, EWS) and sub-category information (PwD status, if applicable) are also printed on the admit card. These details determine your qualifying cutoff marks and affect your eligibility for Junior Research Fellowship.
Verify that your category is correctly mentioned, as errors here can impact your result processing.
Examination Details Section
This section contains the specific information about when and how you will take your examination. These details are crucial for planning your exam day schedule.
Exam Date, Shift Timing, and Reporting Time
The admit card clearly mentions your exact examination date, which falls somewhere between 31st December 2025 and 7th January 2026 for the December session. The shift timing indicates whether you are in Shift 1 (9:00 AM to 12:00 PM) or Shift 2 (3:00 PM to 6:00 PM).
For the three hour UGC NET examination, both Paper I and Paper II are conducted together in a single session without any break.
The reporting time is typically 30 minutes to one hour before the exam starts, may vary slightly by center. For Shift 1, the reporting time is usually around 7:30 AM to 8:00 AM, and for Shift 2, it is around 1:30 PM to 2:00 PM. The gate closing time is also mentioned, after which no candidate is allowed entry regardless of the reason for delay.
Subject Code and Paper Information
Your admit card displays the subject code and subject name for which you have registered. UGC NET covers 85 subjects, and each has a unique code. For example, Law is Subject Code 58, Commerce is Code 08, and so on.
Verify that the subject code matches what you intended to appear for, as appearing for the wrong subject paper is not correctable after the exam.
The admit card also indicates that you will be appearing for both Paper I (General Aptitude) and Paper II (Subject specific) in a combined session.
Paper I consists of 50 questions worth 100 marks, and Paper II consists of 100 questions worth 200 marks, making a total of 150 questions for 300 marks in three hours.
Exam Center Information
The exam center details on your admit card tell you exactly where you need to go on the examination day. This information is critical for planning your travel and reaching on time.
Center Name, Address and City Details
Unlike the city intimation slip, the admit card contains the complete exam center information including the institution name, full address with landmark details, and city. The center could be a college, university, school, or a dedicated testing facility.
NTA allocates centers based on your city preference and the availability of computer based testing infrastructure.
As soon as you download your admit card, search for the exam center location on Google Maps or a similar service.
Note the distance from your residence or accommodation, the available transport options, and the estimated travel time during the expected traffic conditions for that time of day.
If the center is in an unfamiliar area, consider visiting it a day before the exam to familiarize yourself with the route.
Gate Closing Time and Entry Requirements
The gate closing time is strictly enforced at UGC NET exam centers. For Shift 1, the gates typically close at 8:30 AM, and for Shift 2, they close at 2:30 PM. After this time, no candidate is permitted entry under any circumstances, even if the delay was due to factors beyond your control like traffic jams or public transport breakdowns.
The admit card also mentions entry requirements, including the mandatory documents you must carry. These include the printed admit card itself, a valid photo ID proof, and passport size photographs.
Some centers conduct frisking and security checks at the entry point, which takes additional time, so factor this into your arrival planning.
Instructions and Guidelines Printed on the Admit Card
The admit card contains a dedicated section with instructions and guidelines that candidates must follow on examination day. Reading and understanding these instructions beforehand prevents confusion at the center.
Prohibited Items List
The admit card explicitly lists items that are not allowed inside the examination hall. Electronic devices including mobile phones, smartwatches, Bluetooth devices, earphones, and calculators are strictly prohibited.
You cannot carry any electronic gadget even in switched off mode. Storage facilities for prohibited items are not provided at most centers, so avoid bringing them altogether.
Other prohibited items include bags, wallets, handbags, books, notebooks, written material, food items (unless medically required with documentation), and metallic items like large jewelry pieces.
Some centers do not even allow regular wristwatches, so check the specific instructions on your admit card carefully.
Dress Code and Conduct Requirements
While there is no strict formal dress code for UGC NET, it is recommended to wear simple, comfortable clothing without metallic accessories or elaborate designs that might trigger security alarms or require additional checking.
Avoid shoes with thick soles or clothing with multiple pockets that might cause delays during frisking.
Conduct requirements printed on the admit card include instructions about maintaining discipline in the exam hall, not communicating with other candidates, following invigilator instructions, and not attempting any malpractice. Violation of these guidelines can result in cancellation of your candidature and potential barring from future examinations.
UGC NET Admit Card Details Verification: Details to Check
Verifying your admit card details immediately after download is crucial for catching errors before they become exam day problems. A systematic verification process ensures you do not miss any discrepancy that could affect your examination.
Critical Details to Cross Check Immediately
Some details on your admit card require immediate verification because errors in these fields can create serious issues at the exam center or during result processing.
Name Spelling and Date of Birth Accuracy
Compare the name on your admit card with your original application form and the ID proof you plan to carry. Even minor spelling differences, extra spaces, or variations in name order can cause verification problems.
If your ID proof says “Rajesh Kumar Sharma” but your admit card shows “Rajesh K Sharma,” this mismatch might create issues during identity verification at the center.
Your date of birth should exactly match your records across all documents. Cross check it against your ID proof and your Class 10 certificate, which is typically the reference document for date of birth in government examinations. Any discrepancy here needs to be reported to NTA immediately.
Photograph Clarity and Signature Visibility
Examine the photograph on your admit card closely. It should be clear enough for the invigilator to compare it with your face. If the photograph appears blurred, distorted, or significantly different from your current appearance (perhaps you uploaded an old photo), this could cause verification delays. The signature should also be visible and match your natural signing style.
If either the photograph or signature is not clearly printed, check if the issue is with your printout quality. Try printing again with different settings or on a different printer. If the problem is in the downloaded PDF itself, contact NTA helpline as this indicates an issue with your uploaded images during registration.
Subject and Category Verification
These details directly impact what paper you appear for and how your results are processed. Errors here can have significant consequences on your qualification.
Confirming Your Opted Subject Code
Verify that the subject code and name on your admit card match the subject you intended to register for. This is especially important if you changed your subject selection during the correction window. The subject code determines which Paper II question set you will receive on the computer screen during the exam.
If you find a subject mismatch, contact NTA immediately. Appearing for the wrong subject paper will waste your entire examination attempt, as there is no provision for correcting this after the exam.
Category and PwD Status Verification
Check that your category (General, OBC-NCL, SC, ST, EWS) is correctly reflected on the admit card. This information is used to determine your qualifying cutoff, which varies significantly across categories.
A General category candidate needs approximately 40% aggregate marks to qualify, while reserved category candidates need around 35%.
If you had claimed PwD (Persons with Disability) status during registration, verify that this is correctly mentioned. PwD candidates receive additional benefits including relaxed eligibility criteria, age relaxation for JRF, and special seating arrangements. An error in PwD status could deprive you of these legitimate benefits.
Exam Center and Timing Verification
Verifying center and timing details helps you plan your exam day logistics effectively and reach the venue without any confusion.
Locating Your Exam Center on Maps
As soon as you note your exam center address, search for it on Google Maps or any navigation application. Verify that the address exists and is correctly mapped. Sometimes exam centers are in newly established institutions that may not show up accurately on older map versions.
If the location seems unclear or the mapped address looks different from what you expected, try searching for the institution name directly. You can also call the institution to confirm their address. Planning your route in advance eliminates navigation stress on exam day.
Planning Your Travel Based on Reporting Time
Calculate the travel time from your residence or accommodation to the exam center, considering the expected traffic conditions for your reporting time. For a morning shift with 7:30 AM reporting, factor in early morning traffic patterns. For an afternoon shift with 1:30 PM reporting, consider lunch hour congestion.
Add a buffer of at least 30-45 minutes to your calculated travel time to account for unexpected delays. Identify backup transport options in case your primary mode fails. If the center is far, consider staying at accommodation nearby the night before to minimize exam day travel.
What to Do If You Face Problems Downloading the Admit Card?
Technical issues and forgotten credentials are common problems candidates face during admit card download. NTA has established processes to handle these situations, and knowing them in advance saves you from panic.
Recovering Forgotten Application Number
Your application number is essential for downloading the admit card and for any future communication with NTA regarding your examination. If you have forgotten it, recovery is possible through multiple methods.
Step by Step Recovery Using Email and Mobile
Visit the NTA UGC NET portal and navigate to the login page. Look for a link that says “Forgot Application Number?” and click on it. You will be directed to a recovery page where you need to enter details like your name, registered email address, and registered mobile number. The combination of these details helps the system identify your record.
After submitting the required information, the system will either display your application number on screen or send it to your registered email and mobile via SMS. Check your inbox and SMS messages, including spam or junk folders, for the application number notification.
Information Required for Application Number Retrieval
To recover your application number, you need to provide your full name exactly as entered during registration. Any variation in spelling or format may cause the system to not find your record. You also need access to either your registered email address or mobile number to receive the application number.
If you no longer have access to both your registered email and mobile number, the recovery becomes more complex. In such cases, you may need to contact NTA helpline directly with your identification details and request manual assistance in retrieving your application number.
Resetting Forgotten Password
If you remember your application number but have forgotten the password, NTA provides a straightforward password reset mechanism using OTP verification.
Password Reset Options Available
On the login page, click the “Forgot Password?” link. You will see options to reset your password using either your registered email address or registered mobile number.
Choose the option for which you have current access. Some systems also offer security question based recovery if you had set up security questions during registration.
Select your preferred recovery method and proceed to the verification step. The system will send a One Time Password (OTP) to your chosen contact method, which you need to enter to verify your identity before setting a new password.
OTP Based Password Recovery Process
After selecting your recovery method (email or mobile), click the button to request an OTP. The OTP is typically a 6 digit numeric code valid for a limited time, usually 10-15 minutes. Enter this OTP in the designated field on the website. Do not share this OTP with anyone or enter it on any website other than the official NTA portal.
Once the OTP is verified, you will be prompted to create a new password. Follow the password requirements (usually a combination of uppercase, lowercase, numbers, and special characters). After setting the new password, use it along with your application number to log in and download your admit card.
Troubleshooting Technical Download Issues
Sometimes the problem is not with your credentials but with technical issues like browser compatibility, server overload, or connectivity problems.
Browser Compatibility and Cache Clearing
If the website is not loading properly or showing errors, first try clearing your browser cache and cookies. Go to your browser settings, find the option to clear browsing data, and select cached images and files along with cookies. After clearing, close and reopen the browser before trying again.
If clearing cache does not help, try using a different browser. Google Chrome, Mozilla Firefox, and Microsoft Edge generally work well with NTA portals. Avoid using older browsers or mobile browsers that might have compatibility issues with the website’s features.
Server Timeout and Alternative Access Methods
During peak download periods, especially immediately after admit card release, the NTA server experiences heavy traffic and may timeout or load slowly. If you encounter server errors or extremely slow loading, wait a few hours and try again during off peak hours like late night or early morning when fewer candidates are accessing the portal.
If the main website continues to have issues, check if NTA has provided any alternative download links in their notifications. Sometimes they host admit cards on mirror servers during high-traffic periods. You can also try accessing the website through a different internet connection if your current network seems to have connectivity issues.
How to Report Errors in Your Admit Card?
If you find genuine errors in your admit card after downloading, NTA has a process for reporting and potentially correcting these discrepancies before the examination.
Types of Errors That Can Be Corrected
Errors in personal details like name spelling, date of birth, or category that occurred due to data entry mistakes can potentially be corrected if reported in time. Photograph and signature issues that are clearly system errors rather than candidate upload mistakes may also be addressed. Subject code errors that happened due to technical glitches during form submission can be investigated.
However, certain errors cannot be corrected at the admit card stage. If you deliberately provided wrong information during registration to gain unfair advantage, NTA will not entertain correction requests. Similarly, changes requested purely for convenience without genuine error (like wanting to change your exam center to a different city) are typically not accepted.
Contacting NTA Helpline for Discrepancy Resolution
To report admit card errors, contact the NTA helpline at 011-40759000. These numbers are operational during working hours from 10:00 AM to 5:30 PM on working days. You can also send an email to [email protected] with your application number, the specific error details, and supporting documents if required.
When contacting NTA, be specific about the error and provide clear evidence of the correct information. For name errors, attach a scan of your ID proof showing the correct name. For category errors, attach your category certificate. The more documentation you provide, the faster your issue can be resolved.
Timeline for Error Correction Before Exam
Report any errors as soon as you discover them. NTA typically requires a few working days to investigate and process correction requests. If you report an error just one or two days before your exam date, there may not be sufficient time to issue a corrected admit card.
In some cases where corrections cannot be completed before the exam, NTA may advise you to appear for the examination with the current admit card while the correction is being processed. They will make a note in their records about the pending correction. However, this is handled on a case-by-case basis, so early reporting is always the safer approach.
Documents Required with UGC NET Admit Card on Exam Day
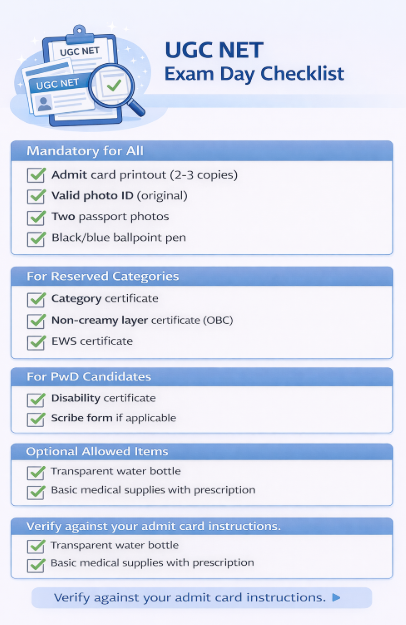
Your admit card alone is not sufficient for entry into the examination hall. NTA mandates additional documents for identity verification and administrative purposes. Having all required documents ready prevents exam day complications.
Mandatory Identity Proofs Accepted by NTA
Every candidate must carry a valid, original photo identity proof along with the admit card. NTA has specified a list of acceptable ID proofs that exam center staff are trained to verify.
Government Issued Photo ID Options
NTA accepts several government issued photo identity proofs including Aadhaar Card (with photograph), PAN Card, Passport, Voter ID Card, Driving License, and Ration Card with photograph.
The ID proof must be original; photocopies or digital copies on mobile phones are not accepted. The ID should be valid and not expired.
Which ID Proof Works Best for Verification
Among the accepted ID proofs, Aadhaar Card is the most convenient because it contains a clear photograph and is universally recognized. Passport is equally reliable but may be excessive for a domestic examination. Voter ID and PAN Card are good alternatives if your photograph is clearly visible on them.
Choose an ID proof where your photograph is recent and resembles your current appearance. If your ID proof has an old photograph where you look significantly different (different hairstyle, with or without beard, weight change), you may face additional verification questions.
Also ensure the name on your ID proof matches the name on your admit card as closely as possible.
Additional Documents for Specific Categories
Candidates claiming reservation benefits or special provisions need to carry additional documentation to validate their claims at the examination center.
PwD Certificate Requirements
Candidates who registered under the Persons with Disability category must carry their disability certificate issued by a competent medical authority. This certificate should clearly mention the type of disability, the percentage of disability, and confirm that the disability is permanent in nature.
The certificate must be issued by a government hospital or a medical board authorized to issue such certificates.
If you claimed eligibility for a scribe or compensatory time during registration, your admit card will reflect this. You need to carry documents supporting your scribe requirement. The scribe arrangements are typically made at the exam center, and you need to provide the scribe’s details in the prescribed format.
Category Certificate for Reserved Candidates
Candidates belonging to SC, ST, or OBC-NCL categories should carry their category certificates issued by the competent authority. While these certificates are primarily verified during JRF award processing and not necessarily at the exam center, having them ready prevents any potential issues.
OBC candidates specifically need the Non Creamy Layer certificate, which should be valid and issued within the timeframe specified in the notification. EWS candidates need their EWS certificate issued by the appropriate authority. These certificates become crucial during result processing for determining category wise cutoffs and JRF allocation.
Passport Size Photographs and Other Essentials
Beyond identity documents, you need to carry certain other items mentioned in the admit card instructions.
Photo Specifications for Attendance Sheet
Carry two passport size photographs that are identical to the one you uploaded during registration. At the examination center, you will be required to paste one photograph on the attendance sheet and sign across it.
The photograph should be recent, taken against a white background, with your face clearly visible.
The photograph dimensions should be standard passport size (3.5 cm × 4.5 cm or as specified). Carrying identical photographs ensures consistency between your admit card photo, attendance sheet photo, and physical appearance, making verification smoother.
Items Allowed Inside the Exam Hall
The only items allowed inside the exam hall are your admit card, ID proof, and photographs. You will be provided rough sheets for calculation and a pen at the exam center. Some centers provide drinking water, while others allow candidates to carry a transparent water bottle.
For female candidates, basic sanitary supplies may be allowed after inspection. Diabetic candidates carrying insulin or sugar supplements need to show supporting medical documentation. Any item not explicitly allowed on your admit card should be assumed to be prohibited.
UGC NET Exam Day Guidelines from Admit Card
The admit card contains specific guidelines for exam day conduct that candidates must follow. Understanding these guidelines beforehand helps you prepare appropriately and avoid any unpleasant surprises at the exam center.
Reporting Time and Gate Closure Rules
Timing is absolutely critical on exam day. The admit card specifies exact reporting times and gate closure times that are enforced without exceptions.
When to Reach the Exam Center
For Shift 1 (9:00 AM to 12:00 PM), the typical reporting time is between 7:30 AM and 8:00 AM. For Shift 2 (3:00 PM to 6:00 PM), reporting time is usually between 1:30 PM and 2:00 PM. However, you should check your specific admit card as these times may vary slightly based on the center and any special instructions from NTA.
Plan to reach the exam center at least 15-30 minutes before the reporting time mentioned on your admit card. This buffer accounts for the time needed to locate the correct building, find your designated room, complete security checks, and settle at your assigned computer terminal.
Consequences of Late Arrival After Gate Closure
The gate closing time is final, and no candidate is allowed entry after this time regardless of the reason for delay. For Shift 1, gates typically close at 8:30 AM, and for Shift 2, gates close at 2:30 PM. Traffic jams, vehicle breakdowns, wrong route taken, or any other excuse will not be considered for late entry.
Missing the gate closure means missing the exam entirely for that cycle. There is no provision for re-scheduling or appearing in a later shift. This is why planning your travel conservatively with multiple buffers is essential. Your months of preparation depend on reaching the center on time.
Security Check and Biometric Verification Process
Modern exam centers have multi layered security protocols to prevent malpractice. Knowing what to expect helps you move through these processes efficiently.
What Happens at the Entry Gate
At the exam center entrance, security personnel will conduct a physical frisking to check for prohibited items. You will be asked to show your admit card and ID proof for preliminary verification. Metal detectors may be used to scan for electronic devices.
Any prohibited items found will be confiscated, and carrying certain items may result in being denied entry.
After clearing security, you proceed to the registration desk where your admit card is verified against the candidate list. Your identity is confirmed by comparing your face with the photograph on the admit card and ID proof. You may be asked to sign to verify your signature matches.
Biometric Attendance Requirements
NTA has implemented biometric verification at UGC NET exam centers. This involves capturing your fingerprint and taking a live photograph at the center. These biometric records are matched against your registration data to confirm your identity and prevent impersonation.
When you reach your assigned computer terminal, you may undergo another round of biometric verification. The captured biometric data is stored and used during result processing to verify that the person who appeared for the exam matches the registered candidate. Cooperate fully with the biometric capture process to avoid delays.
Prohibited Items and Exam Hall Conduct
The admit card clearly lists items that cannot be carried into the exam hall and the expected behavior during the examination.
Electronic Devices and Personal Belongings
Mobile phones, even in switched off mode, are strictly prohibited inside the exam center premises. This includes smartphones, basic phones, smartwatches, fitness bands, Bluetooth earphones, wireless earbuds, calculators, and any other electronic devices.
Most centers do not provide storage facilities for these items, so the safest approach is to not bring them at all.
Personal belongings like bags, wallets with extra compartments, books, notebooks, loose papers, and food items are also not allowed. If you must bring a bag to the center (for example, if you are traveling from another city), check if there is a baggage counter outside the exam hall where you can deposit it, though security of deposited items is your responsibility.
Behavior Guidelines During the Exam
Once inside the exam hall, maintain complete silence and do not communicate with other candidates. Follow all instructions given by the invigilators. Do not look at other candidates’ screens or attempt to copy. Do not create any disturbance or engage in any activity that could be construed as malpractice.
If you need assistance during the exam (for example, if your computer malfunctions or you need to use the washroom), raise your hand and wait for the invigilator to come to you. Do not leave your seat without permission. Any suspicious behavior may result in your candidature being cancelled, and you could be barred from future NTA examinations.
Conclusion
Downloading your UGC NET admit card is a straightforward process when you know exactly what steps to follow and have your credentials ready. The key is to start early, as soon as NTA releases the admit card, rather than waiting until the last day when server traffic is highest and troubleshooting time is limited.
Visit the official NTA UGC NET website as soon as the admit card notification appears, and complete your download within the first few days of release.
Once downloaded, verify every detail on your admit card systematically. Check your name, date of birth, photograph, category, subject code, and exam center information against your original application and identity documents.
Any discrepancy should be reported to NTA immediately through their helpline at 011-40759000 or email at [email protected]. Remember that early detection of errors gives you the best chance of getting them corrected before exam day.
Finally, prepare all your exam day documents in advance: multiple copies of the admit card printout, original photo ID proof, passport photographs, and category certificates if applicable.
Keep them in a dedicated folder or pouch that you will carry to the exam center. Plan your travel route, check the exam center location, and decide what time you need to leave to reach comfortably before the reporting time.
For more comprehensive guidance on your UGC NET preparation journey, explore our complete UGC NET preparation guide and subject specific resources on LawSikho.
Frequently Asked Questions
When will the UGC NET December 2025 admit card be released?
The UGC NET December 2025 admit card is expected to release in the third to fourth week of December 2025, approximately four to seven days before the exam dates. The examination is scheduled from 31st December 2025 to 7th January 2026. Keep checking the official NTA website regularly from early December onwards.
Can I download my UGC NET admit card on mobile phone?
Yes, you can access the NTA website and download the admit card PDF on a mobile phone with a web browser. However, for better visibility and to avoid technical issues, downloading on a laptop or desktop computer is recommended. Regardless of which device you use for downloading, you must take a printout on A4 paper as digital copies are not accepted at the exam center.
What should I do if my photograph is not clear on the admit card?
First, check if the issue is with your printout quality by trying to print on a different printer with better settings. If the photograph is blurred in the downloaded PDF itself, contact NTA helpline at 011-40759000 immediately. Provide your application number and explain the issue. NTA may advise you to appear with the current admit card while noting the discrepancy in their records.
Is a color printout of the admit card mandatory?
No, a black and white printout is acceptable as long as all details including your photograph and signature are clearly visible. However, a color printout is preferred as it provides better clarity for photograph verification. Ensure you print on clean A4 paper without any smudges or fading.
Can I appear for the exam if my name is spelled incorrectly on the admit card?
You should first report the error to NTA through their helpline and email. If the error cannot be corrected before your exam date, NTA typically advises candidates to appear with the current admit card while carrying ID proof showing the correct spelling. A note is made in their records about the pending correction. However, significant name mismatches may cause verification problems.
What is the difference between city intimation slip and admit card?
The city intimation slip releases first and tells you only the city where your exam center will be located. It does not contain the exact exam center address. The admit card releases later and contains complete information including the specific exam center name, full address, gate closing time, and all examination guidelines.
How many copies of the admit card should I carry to the exam center?
Carry at least two to three printouts of your admit card to the exam center. One will be collected or signed during the attendance process, and extras serve as backup in case one gets damaged or lost. Keep the copies in a waterproof folder to protect them from rain or accidental spills.
What happens if I forget to carry my admit card to the exam hall?
Without your admit card, you will not be allowed to enter the examination center. There is no provision for entry based on other documents alone or based on showing the admit card on your mobile phone. If you realize you have forgotten it while travelling to the center and have time, go back and get it. Otherwise, you will miss the examination.
Can I use Aadhaar card as identity proof along with the admit card?
Yes, Aadhaar card is one of the primary identity proofs accepted by NTA for UGC NET examination. Ensure your Aadhaar card is original (not a photocopy), has a clear photograph, and the name on it reasonably matches your admit card name. E-Aadhaar printed on plain paper is also accepted as long as it is clearly legible.
Will NTA send the admit card by post or email?
No, NTA does not send the admit card by post or email. Candidates must download it themselves from the official website using their login credentials.
What should I do if the NTA website is not loading during admit card download?
Try during off peak hours like late night or early morning when fewer candidates are accessing the portal. Clear your browser cache and cookies, try a different browser, or switch to a different internet connection. If the issue persists for more than a day, contact NTA helpline as they may provide alternative download links during high traffic periods.
How long should I preserve the admit card after the exam?
Preserve your admit card until you receive your final result and, if qualified, until you receive your UGC NET certificate. The admit card may be required for result verification, certificate collection, or resolving any discrepancies during result processing. Many candidates keep it for at least one year after the examination.
What is the NTA helpline number for admit card related issues?
The NTA helpline numbers for UGC NET queries including admit card issues are 011-40759000 and 011-69227700. These lines are operational from 10:00 AM to 5:30 PM on working days. You can also email your queries to [email protected] with your application number and detailed description of the issue.
Can I make any corrections on the printed admit card myself?
No, you must not make any manual corrections, overwriting, or alterations on the printed admit card. Any handwritten changes will invalidate the admit card and may result in denial of entry at the exam center. All corrections must be requested through NTA’s official process and reflected in a fresh download.


 Allow notifications